
 English
 Svenska
Categories
Managing the navigation menu
Add, rename, reorder, and set click actions for the items in your site's navigation menu.
On this page
With the Website Builder, you can have anything from simple navigation to a complex hierarchy of pages and subpages. This tutorial shows you how to customize your navigation items and assign different actions to them.
Navigation menu options
All templates come with a navigation menu enabled in the Header block. To hide the navigation menu from the header, see our Header block tutorial.
At the start, you only have one page on your website and in the navigation menu: the Home page.
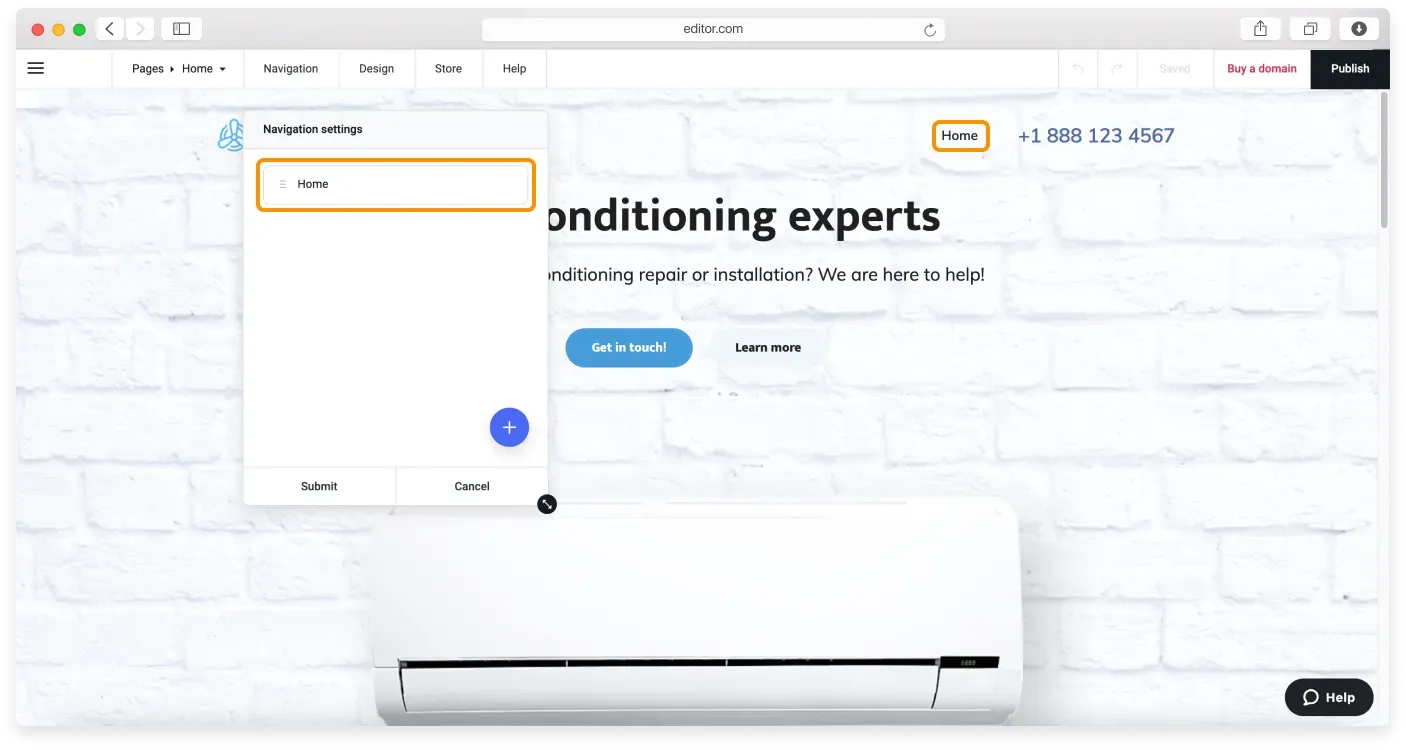
When you create more pages, they are automatically added to the navigation menu, unless you untick the Add to navigation checkbox. In that case, you will not see the page’s name in the list of items, but you can add it manually.
In the Navigation settings window, you can:
- Add a new item to the navigation menu by clicking the (+) Plus button
- Delete a page from the navigation menu
- Change the order of the navigation menu items
- Change the click action of a menu item
- Change the name of a menu item
Adding pages
You cannot add new pages from the Navigation settings window. To do this, use the Page manager.
Accessing the navigation menu
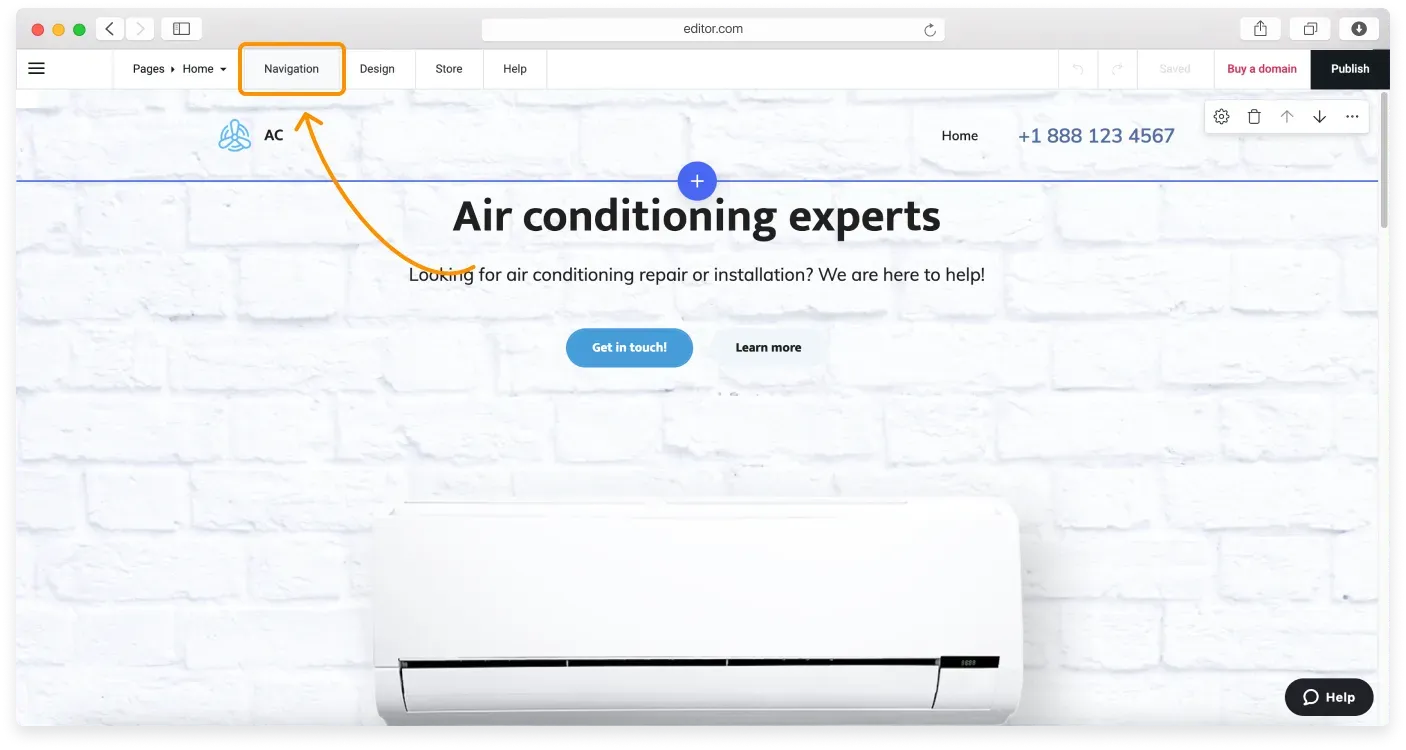
To open Navigation settings, click the Navigation button in the Topbar.
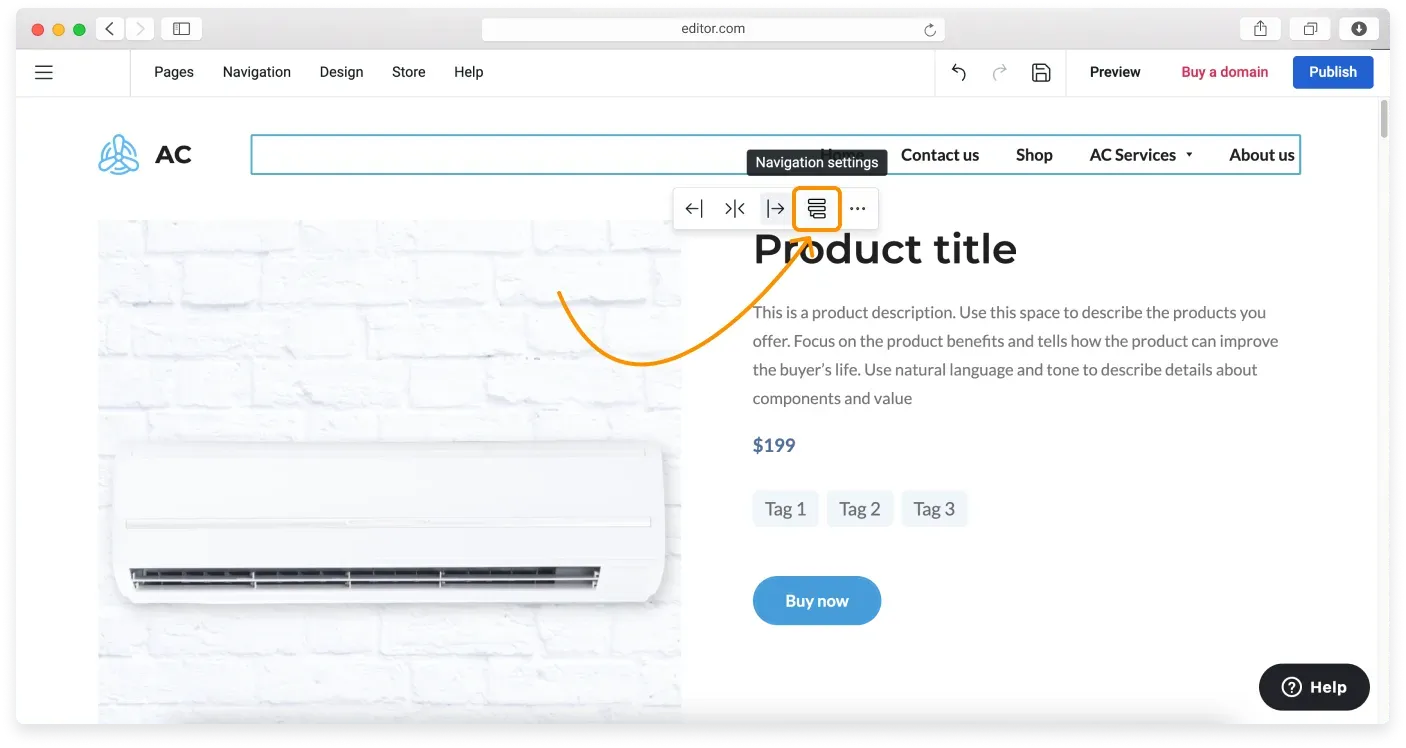
Alternatively, click the navigation menu itself, and then click the folder tree icon.
Let’s explore managing the navigation menu items in detail.
Editing the Navigation settings
In the Navigation settings window, you can perform three actions:
- Change the order of the navigation menu items by dragging and dropping them into place.
- Open the Item settings, where you can change a navigation item’s name and click action.
- Delete an item from the navigation menu (without deleting the page itself) by clicking the trash bin icon next to the item’s name.
You can open a navigation item’s settings by clicking the gear icon next to its name.
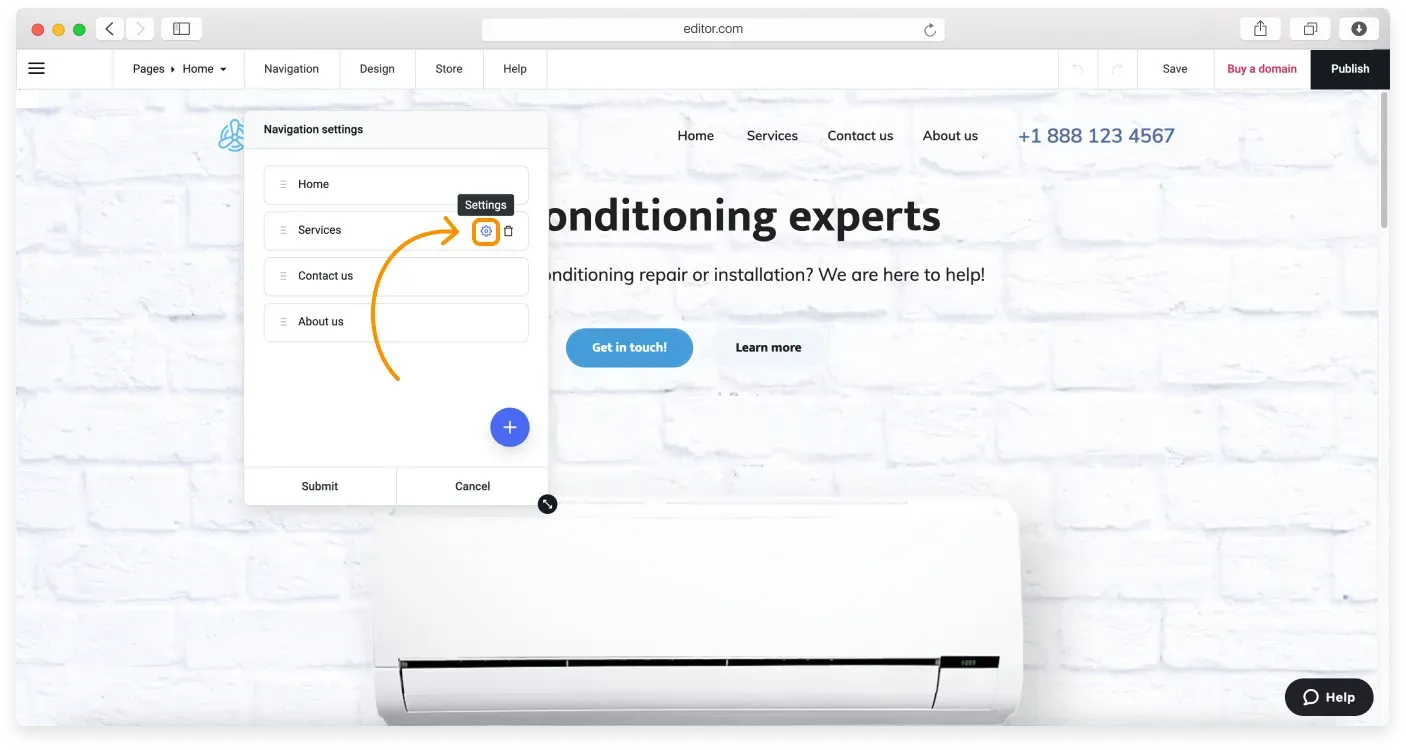
In the Item settings window, you can name or rename your navigation menu item and set its click action.
Click actions appear in a drop-down menu with the following options:
- Open a page: opens a page on your website.
- Make a phone call: lets visitors make a phone call without leaving your website.
- Send an email: lets visitors instantly send you emails.
- Download a file: lets visitors download a file.
- Scroll to a block: scrolls down to another block on the page.
- Open a web address: opens an external URL.
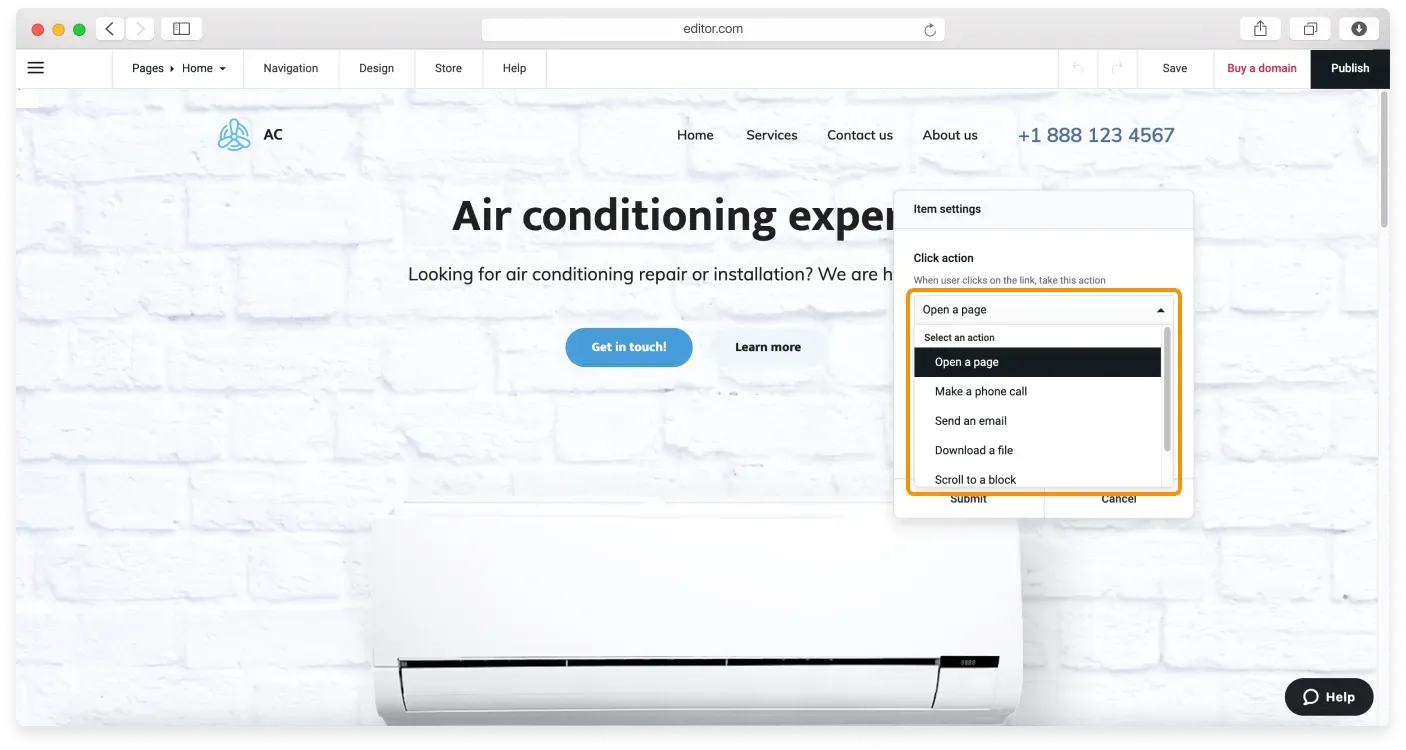
Once you have chosen the click action, enter the new item name in the Title field below. Let’s explore the click action options in detail.
Adding a link to your website page
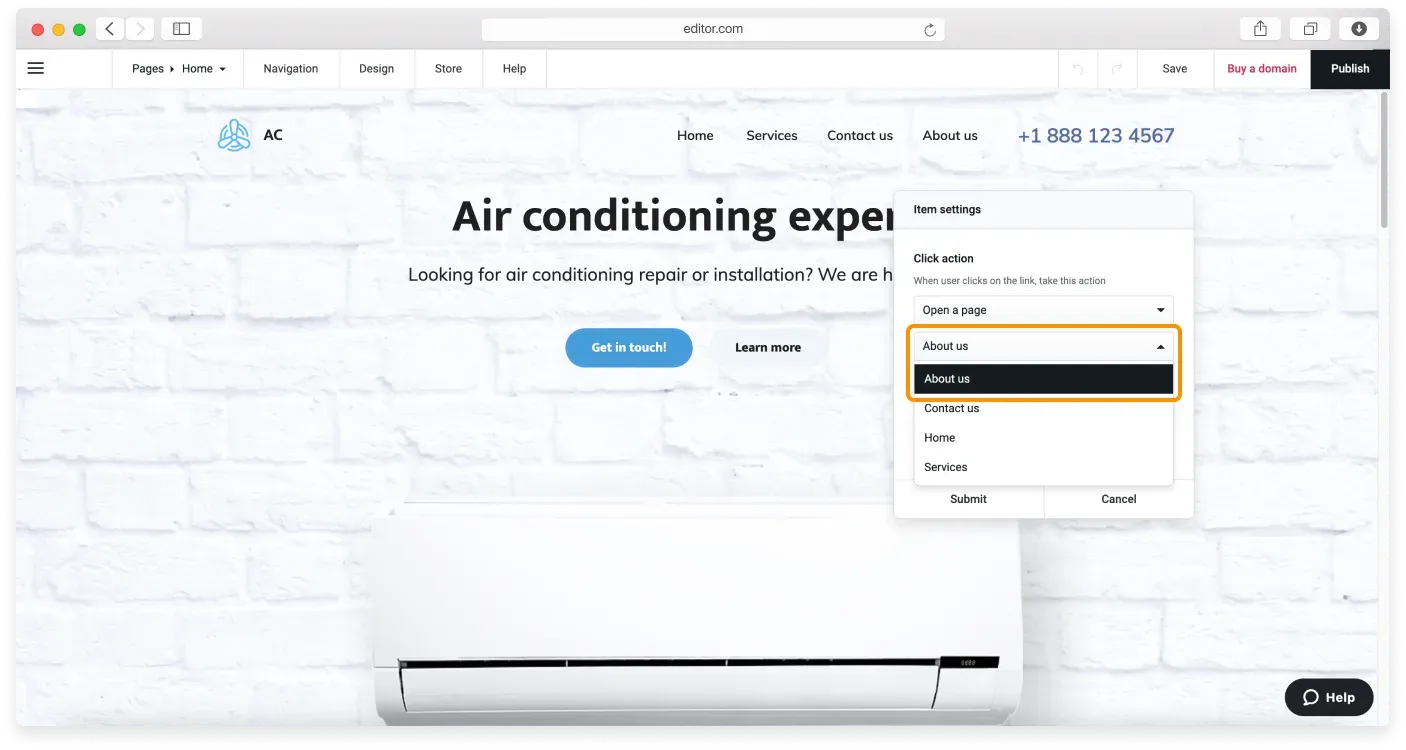
- In the Item settings window, choose Open a page from the Click action drop-down menu.
- Select the page you want this click action to open.
- Specify the page title in the respective field.
- Click Submit.
Make a phone call
This option lets visitors call you without leaving your website. Here is how to enable it:
- In the Item settings window, choose Make a phone call from the Click action drop-down menu.
- Enter your phone number in an international format.
- Specify the title, for example, Call us.
- Click Submit.
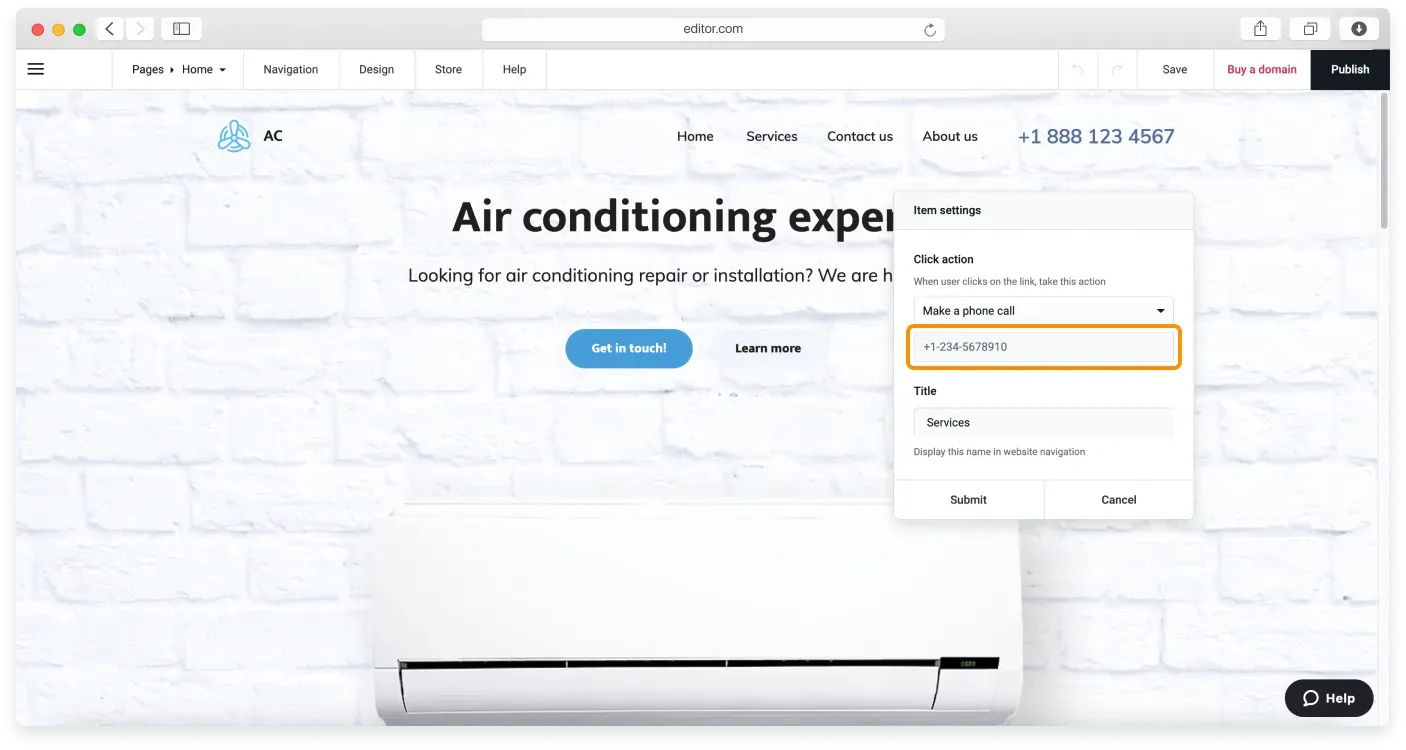
Once the changes are saved, you will see the new item in your navigation menu.
Send an email
This option enables a mailto link, a link that points to an email address. When a visitor clicks it, the default email client on their computer opens so they can send you a message without having to type in your address. Here is how to enable it:
- In the Item settings window, choose Send an email from the Click action drop-down menu.
- Enter your email address.
- Specify the title in the respective field, for example, Email us.
- Click Submit.
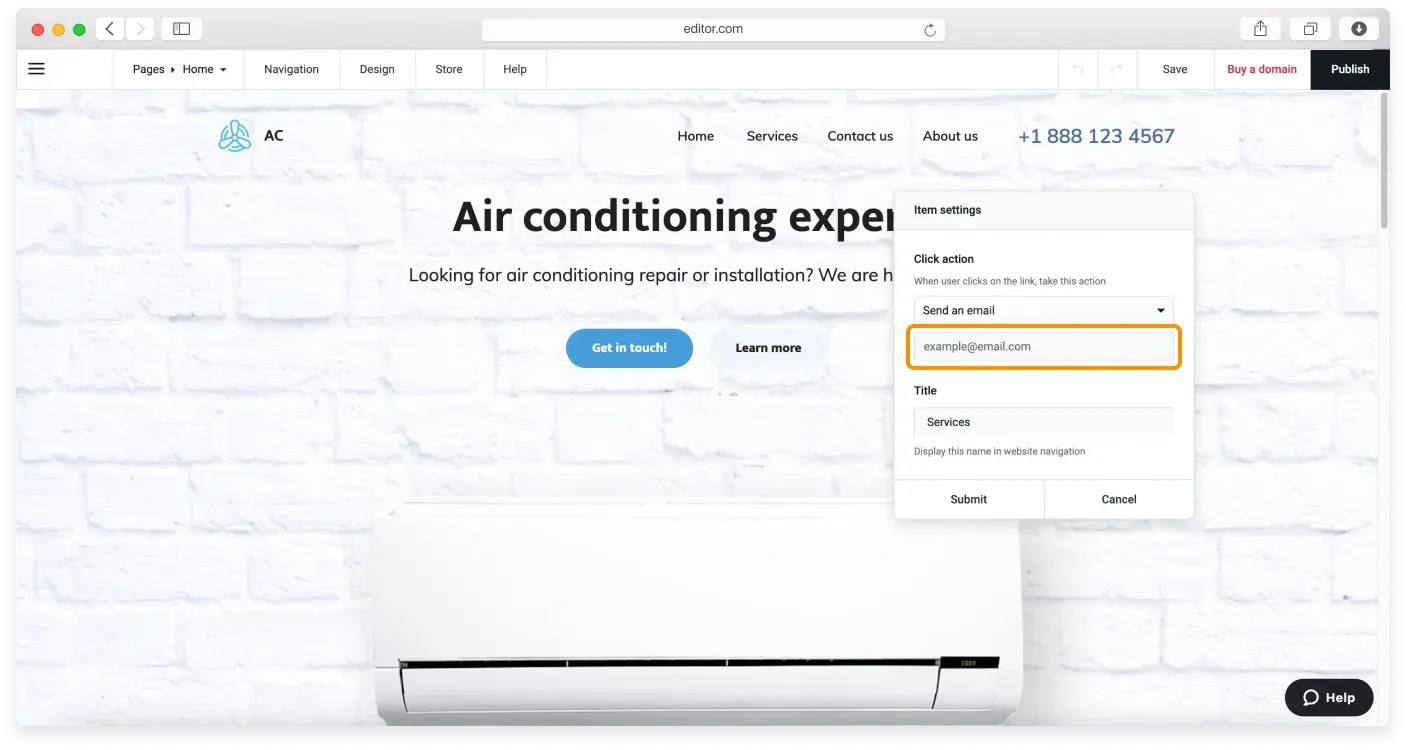
Once the changes are saved, you will see the new item in your navigation.
Links to downloadable files
To add a downloadable file to your navigation menu, see our dedicated tutorial on adding a link to a downloadable file as a submenu item.
Scroll to a block
You can add a link that scrolls to a selected block on the current page. Here is how:
- In the Item settings window, choose Scroll to a block from the Click action drop-down menu.
- Type in the item’s title, for example, Photos, if you want to scroll to the Gallery block.
- Click Submit.
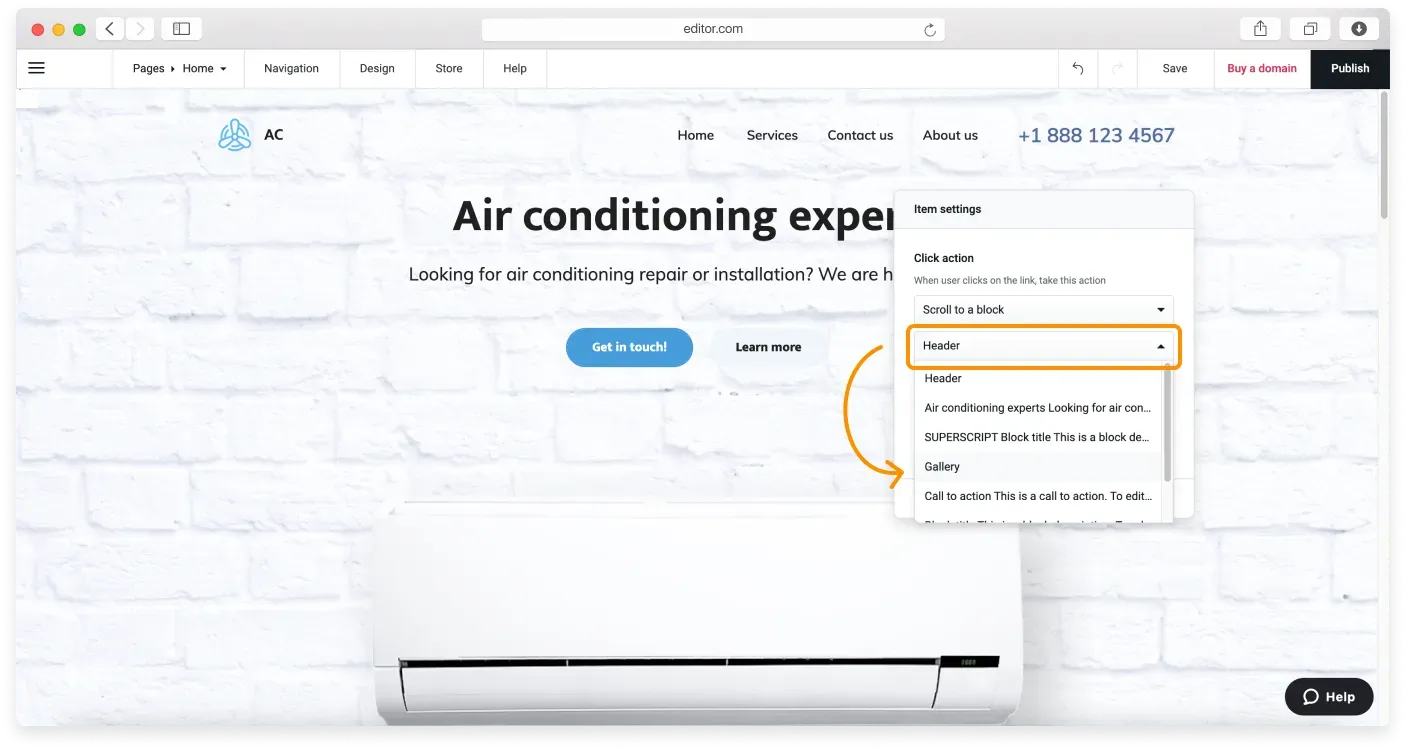
Once the changes are saved, you will see the new item in your navigation.
Links to external websites
If you want to link an external website in your navigation menu, follow these steps:
- In the Item settings window, choose Open a web address from the Click action drop-down menu.
- Copy the URL of the page you want to link and paste it into the click action field.
- Tick the Open in a new tab and Add a Nofollow tag checkboxes if you need them.
- Type in the item’s title. It depends on where you link to, but you can use the external site name if you are unsure.
- Click Submit.
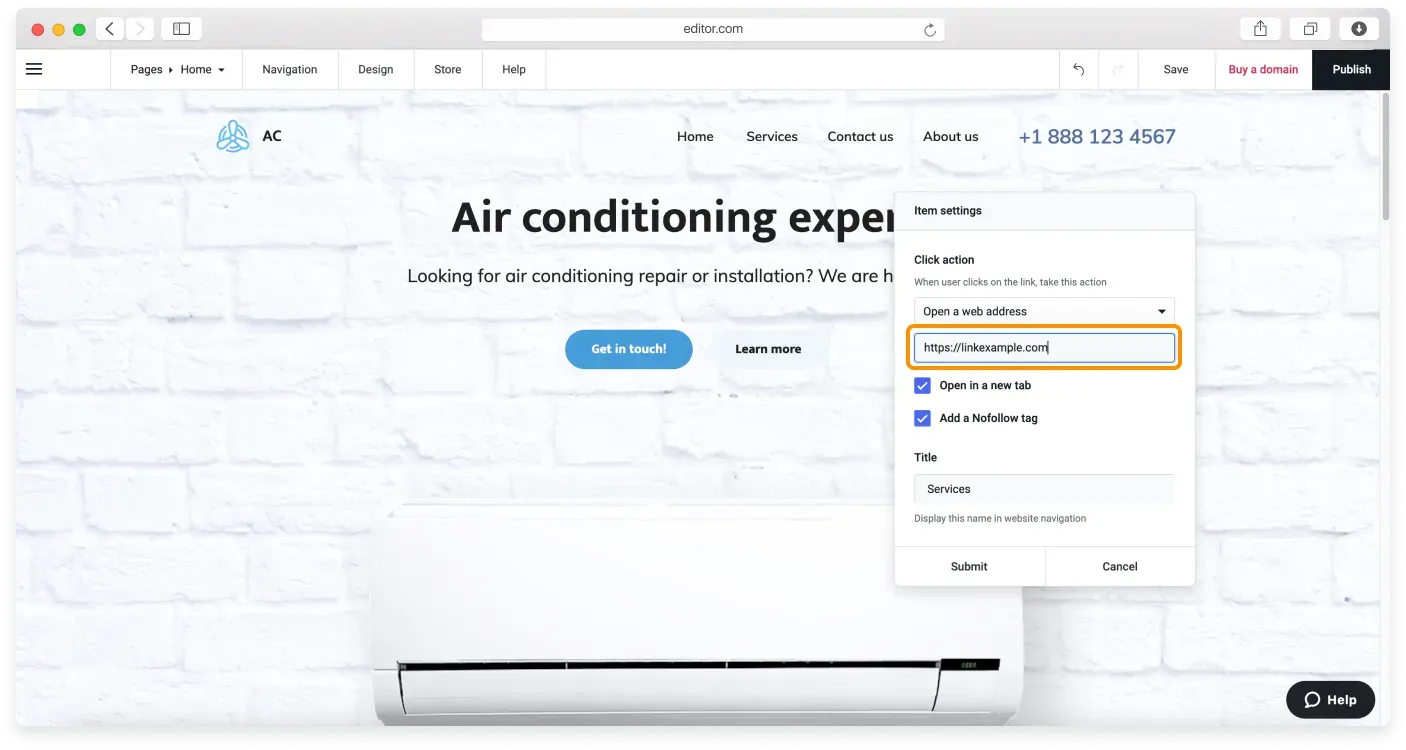
Once the changes are saved, you will see your external website link in your site’s navigation.
Navigation alignment
You can align the navigation menu items however you prefer to create the perfect website header. Click the navigation menu to enable its controls and choose the alignment you like.
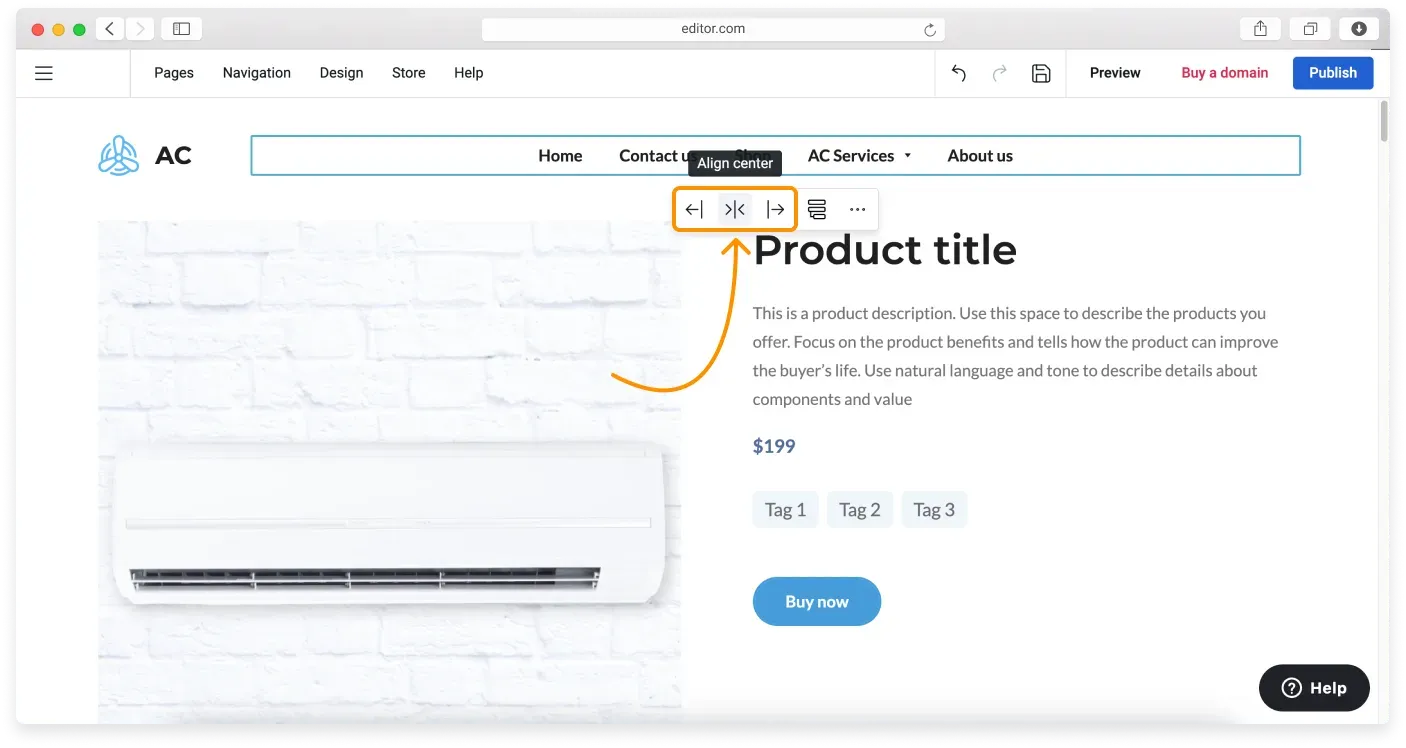
You can also manage navigation in your Footer block. Learn how in our Footer block tutorial. If you want to learn how to remove a navigation menu item, see our tutorial on hiding a page link from the navigation.
Related articles
- Custom blockBuild a block from scratch by arranging widgets like text, images, buttons, and forms exactly how you want.
- Block settingsAdjust a block's layout and appearance, from background and spacing to alignment, borders, and overlays.
- Premium blocksAccess advanced, trend-focused block layouts available on paid Website Builder plans.
Can’t find what you need?
Contact our team. We’re here 24/7 by email and ticket.