
 English
 Svenska
Categories
Text editing and formatting
Style and format your website text using the text control panes.
On this page
From the very beginning of your work with the Website Builder, you have a pre-designed template that already has coordinating fonts, including their styles and sizes. However, if you want to make your website text stand out, you can customize and style it to your preference using text control panes.
Before you start
If you need to delete demo text and insert your own, refer to our Adding and deleting website text tutorial. If you want to change the font of your whole website, read our dedicated tutorial.
Activating control panes
Each block and its elements have their own control pane that activates when you hover over or click them. This helps you act faster and work only with the element you want to modify.
Clicking the text container activates a short text editing menu, while highlighting a word in the text container calls out the menu’s extended version.
Formatting the text
You can format and style text in the same editor where you add text. Text control panes offer various styling options, which look similar to text formatting in a regular text editor.
Here are the formatting options available:
- Rewriting your text with the AI Text Assistant
- Title width customization
- Heading resizing
- Font size customization
- Making text bold, italic, underlined, or strikethrough
- Adding text effects
- Adding links to the text
- Creating ordered and bulleted lists
- Changing the text color
- Changing text alignment
- Adjusting line and paragraph spacing
- Customizing text indent and outdent
Let’s explore them in detail.
Title width customization
To change your block’s title width, follow these steps:
- Click the block title to enable its border.
- Use one of the edit handles to scale the entire selection by dragging it inwards or outwards.
The block design will adapt to the changes.
Heading resizing
You can turn words and even sentences on your page into a title tag (heading tag), also known as an H1 or H2 tag. You can also change the size of existing headings using the predefined heading tags (Heading 1 to 6, Quote, and normal text).
Why headings matter
When crawling the content of a page, search engine spiders read the HTML code and identify which sentences are enclosed in heading tags (H1, H2, H3, and so on). By using keywords in your heading tags, you help search engines understand what your page is all about. Headings also make it easier for users to navigate through the page.
Here’s how to change the heading size:
- Click the text field to enable the text control pane.
- Highlight the text you want to change and pick the font style from the dropdown lists.
- Click anywhere in the block to enable the changes.
If you need to customize the font size of the text elements beyond the predefined heading options, you can use the font size dropdown menu on the text control pane. Highlight the text you want to customize and choose the relevant font size. Remember to publish your site to make the changes live.
Customizing font style
The control pane also contains commands that make your text bold, italic, underlined, or strikethrough (or all at once). Select the portion of the text you want to change, then click the Bold, Italic, Underline, or Strikethrough icons in the control pane.
Adding links to the text
You can add a link to a word or a phrase. Read our Creating text links tutorial for detailed instructions.
Creating ordered and bulleted lists
Using the text control pane, you can create two types of lists in your texts: ordered and unordered.
Highlight the portion of the text you want to turn into a list, then click the Unordered (with bullet points) or Ordered (with numbers) icons in the control pane.
If you want to add another line to the list, press Enter, and a new bullet point or numbered line will be added below.
List alignment
The lists are always aligned to the left.
Changing the text color
You can change the color of any text portion, from a single word to the entire paragraph. Here’s how to do this:
- Highlight the text you would like to change the color for.
- Click the Text color icon to call out the color palette with the range predefined by our smart interface. If you need more color options, click the (+) Plus icon to open the color picker with a full color palette.
- Click Submit when you’re happy with the chosen color.
The colors you’ve recently used are automatically added to the quick color palette so that you can use them again easily.
You can also customize your site-wide typography colors, including your site name, various headings (H1 to H6), text links, and price labels, by creating a custom color palette for your site.
Changing text alignment
According to the best design practices, most texts in the layouts are aligned to the left. If you want to change this, you can use the alignment icons on the text control pane.
Highlight the text you want to align and click the respective icon.
Customizing text indent and outdent
To change the text indent, place your cursor at the start of the line you want to adjust. Click the Text indent icon on the pane. Click it as many times as you need until the indent feels right.
To reduce the indent, use the Text outdent icon. The process works the same way.
Line and paragraph spacing
You can control line height and paragraph spacing directly from the text toolbar. This helps you fine-tune how compact or open your text looks.
Here’s how to customize your line height:
- Select the text you want to edit.
- Click the Line and Paragraph spacing icon in the control panel.
- From the dropdown menu, choose one of the predefined line height options.
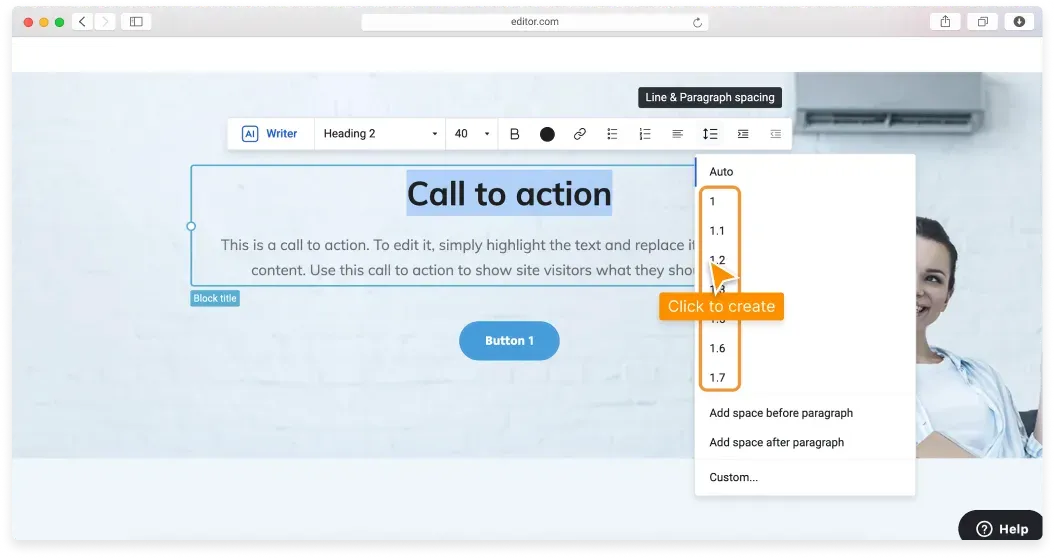
The text will change instantly. In the same dropdown menu you can add or remove spacing before or after a paragraph.
About spacing
Spacing is useful when you want tighter layouts or more control over vertical rhythm. By default, headings include a margin after them to create extra space before the next paragraph. You can remove the space before or after a paragraph if you don’t need it.
Custom spacing
If the predefined options don’t fit your needs, you can customize them via the Custom option. Follow these steps:
- Highlight the text you want to customize spacing for.
- Click the Line and Paragraph spacing icon on the control pane and click the Custom option at the bottom of the dropdown.
- In the new window you can manually set line height, spacing before, and paragraph spacing. Type in your values and click Submit.
If you want to apply custom spacing below text inside a block, make sure to highlight the text itself, not the entire block. For example, if you highlight a heading, the spacing settings will apply only to that heading.
Spacing limits
Maximum line height value: 10. Maximum spacing value: 999.
Hiding text elements in the block
You can hide any text element in your blocks. Just click the text you want to hide, then click the Hide button in the element’s control pane. Remember to publish your website to apply the new changes.
Removing formatting
If you want to remove all the formatting from a text segment, highlight the text and click the Clear icon in the control pane. Remember to publish your website to apply the new changes.
Related articles
Can’t find what you need?
Contact our team. We’re here 24/7 by email and ticket.